Creative Games and Programs For the SORD M5
(Below is only a preview)
You can run a computer!
LET'S PROGRAM THE M5
What is a Program?
A signal that directs the computer to perform a task is called a “command.” A set of commands is required to instruct a computer to process data. The order of commands determines the order of computer processing. Creating sets of instructions for the computer is called “Programming.”
What is a Programming Language?
A programming language is a written system of symbols, understood by the human being and the computer. Since it was once a problem that computer or ‘machine’ language and human language are so different, languages or “interpreters,” which translate human language into computer language, were created.
The M5 is capable of handling 4 kinds of programming languages; BASIC- 1, BASIC-G, BASIC-F, and FALC, and the ROM cartridge of each language has an interpreter. These languages, except for FALC, first need programming according to their respective syntaxes (rules for programming). Then just input the program and the M5 will start processing. If FALC is used, programming is unnecessary. All you do to operate the M5 is to input short commands to meet your needs. Languages like FALC are called “no-programming languages.”
1. How to Input a Program
The simplest way to input a program is to type it on the keyboard. However, it is easy to make mistakes in the process of keyboard operation (input error). If a program with an error is input, a computer will respond with “Err 00 in XX” to indicate that the command makes no sense. In this case, the error should be corrected. An error in a program is called a “bug,” and eliminating a bug is called “debugging.”
2. Input with a cassette tape
Game programs, which are recorded on cassette tapes, are generally available on the market. These programs can be input to the computer automatically by playing the tape after connecting the tape player with the main storage unit of the computer. (This kind of automatic input is called “loading” or “reading.”) When a tape like this is used, input with a keyboard is unnecessary, and, therefore, bugs caused by typing mistakes can be eliminated. However, a computer may be unable to read a program if the tape recorder is not in good condition.
3. Input with a game cartrigde
A game cartridge has the same shape as a ROM cartridge of BASIC or FALC. A program can be processed as soon as the cartridge is set in the slot.
What Kind of Programs to Input?
Programming is not necessary for input with a cassette tape or game cartridge, but it is necessary otherwise.
You can either 1) develop original programs, or 2) type in program listings.
1) Original programming
This is writing your own sequence of commands in BASIC or (BASIC-I, BASIC-G, or BASIC-F). Expect a period of testing and debugging; however, original programming is the best way to learn BASIC languages.
2) Typing in listings
Written programs found in books and magazines are called listings. A program can be input by typing in its listing. Debugging is still necessary, because there will likely be a few typing errors. Once a program is input and recorded on a cassette tape, the program can be processed just by loading the tape. Storing a program via keyboard on a cassette tape is called “saving.”
How to Operate the M5
1) Activating a ROM (game) cartridge
1) Firmly insert a cartridge with the power off.
2) Turn the power on to start processing in BASIC or to play a game.
*Note: Keep the power off whenever a cartridge is inserted or removed.
2) Activating a cassette tape recorder
1) Connect a cassette tape recorder to the M5 main storage unit.
2) Insert a BASIC-I cartridge in the slot and turn the power on. The machine signals that it is ready to process in BASIC by displaying “Ready” on the screen.
3) Play the cassette tape (the tape should be rewound in advance).
4) When the cursor (a square which blinks on and off under the “Ready” signal) shows the letter A, enter “OLD” then press RETURN, so that the tape (automatically) starts program loading. (When the cursor contains the letter K, depress the FUNC and 1 keys together and change the letter to A.) When “Ready” appears on the screen, which indicates the completion of loading, enter “RUN” then press RETURN to start processing. When you wish to stop processing, depress the SHIFT and RESET keys simultaneously.
3) Input with a keyboard
Refer to “Introduction to keyboard input”, starting on page 5 for details.
INTRODUCTION TO THE KEYBOARD
LET'S TRY KEYBOARD INPUT
This book contains 28 program listings starting on page 15. Any of these programs can be input via the keyboard.
Let’s Input a Calculation Program
We will try an easy listing as follows, to get used to inputting with a keyboard.
Program List
10 REM CALCULATION
20 PRINT “TL”
30 INPUT A
40 INPUT B
50 C = A + B
60 PRINT "**ANSWER**";C
70 END
If the cursor contains the letter A, you are ready to input. If not, depress the FUNC and 1 keys together. Let’s try the first line. The screen displays the following.
Go on to the second line. The screen display is as follows.
Run the third line.
Next, the fourth line.
Next, the fifth line.
The sixth line.
(If you made errors, you’ll read how to the correct them in the following section.)
Finally, the last line. Now, the input of this listing is completed. The screen should display the following.
The numbers at the beginning of each line are called line numbers and indicate the order of processing the program.
Now, we check whether all the lines are correctly input in the M5 by using the LIST command. Make sure the cursor contains the letter A and enter LIST, then hit RETURN. A list copied in capital letters from the original list is displayed on the screen. Make sure that both lists have exactly the same content. To make the program run, after the “Ready” sign flashes on the screen, enter RUN and RETURN. The M5 requests the input of a number by displaying a question mark (?) on the screen. For example, enter the number 4 by pushing the 4 key, then the RETURN key. When a question mark again appears on the screen, enter the number 5 by depressing the 5 key, then the RETURN key. Then, the following is displayed on the screen.
This indicates that the M5 processed the calculation 4 + 5 = 9. Next, we deal with how to correct input errors of a program.
How to Correct a List
1) Shifting the cursor
When the list was input, it might have been noticed that all the letters to be input are written in the cursor. If a letter must be corrected, the cursor should be shifted to its position. The directional (-------------- 11) keys along
with the CTRL key are used for shifting the cursor.
CTRL + — One letter space shift to the right CTRL + — One letter space shift to the left CTRL + t One letter space shift upward CTRL + l One letter space shift downward
2) When an incorrect letter is input
Shift the cursor to the position of the letter to be corrected. Enter the correct letter over the incorrect one.
3) When an unnecessary letter is input
Shift the cursor to the position of the letter to be erased.
Depress the CTRL + DEL keys.
4) When an additional letter is necessary
Shift the cursor to the position of the letter to be added. Depress the CTRL and P keys and add the desired letter. Note that the letter inside the cursor changes from A to a when the CTRL + P keys are pressed. As long as the lower case a is inside the cursor, letters can be added consecutively. After letter addition is completed, depress the CTRL + 0 keys, and the letter circumscribed by the cursor returns to A.
Corrections can be made as explained above only before the RETURN key is pushed. If an error is discovered after pushing the RETURN, reinput the whole line and push RETURN again. Then, insure that the error is properly corrected by listing the program. Lastly, here are some additional points to remember.
Points to Remember when Inputting
1) If the left edge of a program is not on the screen, depress the CTRL + T keys to obtain the whole program on the screen.
2) Make sure to press the RETURN key after inputting each line. Otherwise, the input will not be entered.
3) To stop the processing of a program, depress the SHIFT + RESET keys.
KEY MODES
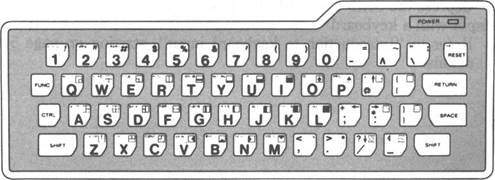
Look at key A on the keyboard. Note that four different letters or symbols are on the key. If you push key A when the letter L is inside the cursor on the screen, only the lower case (a) will appear on the screen. How can the other letters or symbols be displayed on the screen?
1) Alphabet Position (FUNC + 1)
2) Shift Lock Position (FUNC + 2)
3) Graphic Position (FUNC + 3)
4) Function Key
Thus, when the FUNC key plus a number is entered, the mode of the screen changes. Even though the same key is depressed, the letter or symbol differs according to the position.
Using the M5 as a Calculator
The M5 can be used as a calculator with the PRINT command. Example PRINT 5 + 3
When this is input, the result of the calculation is displayed on the screen as follows.
The primary use of the PRINT command is to directly display letters on the screen.
Example PRINT “HELLO”
When this is input, the following is displayed on the screen.
Painting the Screen
To paint the whole screen, first depress the CTRL + the r keys to obtain the GII mode (Graphic Mode II).
10 PRINT
Suppose we wish to paint the screen dark blue. In the GII mode, the screen is divided into three sections labeled 4, 5, and 6. Assign the STCHR command to the character code & 80 (■).
20 STCHR “4444444444444444 ” TO & 80, 6
30 STCHR “4444444444444444 ” TO & 80, 5
40 STCHR “4444444444444444 ” TO & 80, 4
Fill the whole screen with the character code & 80.
50 CLS&80
The entire screen should be dark blue. When you wish to change the color, find the code number of the color desired from chart 1: Color Code. Enter a number to replace the number 4. The color of the screen will change.
Use a Sprite to make a UFO
Now, we’ll add another program to the background we just made. First, we specify the size of the sprite (an animation pattern). We will use a square of 16 dots per side. (Refer to “Make Your Own Animated Cartoons” on page 132 for more details.)
60 MAG 1
Assign a UFO pattern to figure code 64.
70 STCHR “182442427e555566” TO 64
Assign the figure code to the sprite number.
80 SCODO, 64
Color the sprite, e.g., deep red (see the color code chart).
90 SCOLO, 6
Input the speed of the sprite.
100 INPUT
The loop to move the sprite.
110 FOR 1 = 0 TO 100
Fix the number zero position of the sprite.
120 LOCO TO I, 80
The loop to change the speed of the sprite.
130 FOR J = 0 TO S ; NEXT
The NEXT command of the loop to move the sprite.
140 NEXT
This will cause the program loop to run repeatedly.
150 GOTO 10
Input line numbers 10 through 150 and RUN.
Input a number when the speed is asked by the computer.
The smaller the number, the faster the UFO moves.
Depress the RETURN key, and the UFO moves from the left to the right. When it reaches the right edge of the screen, the computer asks for the speed again, the UFO moves by repeating this procedure. Depress the SHIFT + RESET keys to stop processing.
STORING AND RETRIEVING WITH A CASSETTE TAPE
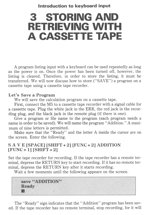
A program listing input with a keyboard can be used repeatedly as long as the power is on. Once the power has been turned off, however, the listing is cleared. Therefore, in order to store the listing, it must be transferred. We will now discuss how to store (“SAVE”) a program on a cassette tape using a cassette tape recorder.
Let’s Save a Program
We will save the calculation program on a cassette tape.
First, connect the M5 to a cassette tape recorder with a signal cable for a cassette tape. Plug the white jack in the ERR, the red jack in the recording plug, and the black jack in the remote plug (if there is one).
Give a program or file name to the program (each program needs a name in order to be saved). We will name the program “Addition.” A maximum of nine letters is permitted.
Make sure that the “Ready” and the letter A inside the cursor are on the screen. Enter the following.
SAVE [SPACE] [SHIFT+ 2] [FUNC + 2] ADDITION [FUNC+1] [SHIFT+ 2]
Set the tape recorder for recording. If the tape recorder has a remote terminal, depress the RETURN key to start recording. If it has no remote terminal, depress the RETURN key after it starts recording.
Wait a few moments until the following appears on the screen.
The “Ready” sign indicates that the “Addition” program has been saved. If the tape recorder has no remote terminal, stop recording, for it will
not stop automatically. Also remember that a maximum of nine letters can be used for a program name. If a tape counter is attached to the tape recorder, you could record the tape count and the program name together, as is done for music tapes.
Check After Saving
After you have completed the SAVE procedure, confirm that the desired program has, in fact, been stored by entering the VERIFY command before turning the power off. Rewind the saved tape and enter the following.
VERIFY [SPACE] [SHIFT+ 2] [FUNC + 2] ADDITION [FUNC+1] [SHIFT+ 2]
Depress the RETURN key and play the tape. The following appears on the screen.
An asterisk (*) beside the name of the program indicates that the computer is checking whether the program has been properly saved on the tape. When the computer completes its check, “Ready” appears on the screen. If the tape recorder has no remote terminal, you have to stop it because it will not stop automatically.
If there is an error in saving, an error warning like “ERR 18 in 0” will be displayed on the screen. When this happens, you have to resave from the beginning. Causes of errors include: 1) the recording volume is too low to VERIFY, 2) the cable is not connected, 3) the head of the tape recorder is dirty, etc.
An Example of the Use of the VERIFY command
When you wish to find out which program is recorded on which part of a tape, use the VERIFY command. First, check for unused programs by inputting VERIFY H. Then the programs stored on the tape are displayed on the screen. The part of a program to be saved can be found without clearing the whole program. This program can be retrieved at any time since it has been checked with the VERIFY command. You can turn the power off because the program is already saved on the tape. If you want to be especially careful, save the program on another tape as a backup. This way, even when the first tape is not available, the backup can be used to process the program. Next, let’s process a program saved on a cassette tape.
Retrieve a program from tape (OLD)
The command to retrieve a program saved on a tape is “OLD.” We will process the “Addition” program saved earlier with the OLD command.
First, rewind the tape to obtain the part containing the “Addition” program. Input “OLD Addition” by pressing [SHIFT 2] RETURN. Start playing the tape. Then the following is displayed on the screen:
This indicates that the computer found the program called “Addition.” The appearance of an asterisk (*) means that the computer is reading the program. The “Ready” sign is displayed on the screen when the “OLD” command has finished processing. Now RUN the program.
OLD without a File Name
Enter OLD, [RETURN], and the computer reads the first listing found. Press the SHIFT + RESET keys to stop processing
(End of preview)
